Hosting on Digital Ocean
When you are ready to launch your site, there are several steps to follow. We will be hosting the catalog sites through Digital Ocean as web services. Our database for Strapi is also on Digital Ocean, which makes it a bit easier to attach to the catalog instance. I will list the detailed instructions below for hosting on Digital Ocean.
Much steps. So follow. 🐕
Before starting, please add production folders to /strapi/config. You will need to add the folder env with another folder called production nested within. Inside the production folder add the following files:
database.js
const parse = require("pg-connection-string").parse;

const { host, port, database, user, password } = parse(
  process.env.DATABASE_URL
);

module.exports = ({ env }) => ({
  connection: {
    client: 'postgres',
    connection: {
      host,
      port,
      database,
      user,
      password,
      ssl: {
        rejectUnauthorized: false,
      },
    },
      debug: false,
  },
});
server.js
module.exports = ({ env }) => ({
  proxy: true,
  url: env('APP_URL'), // replaces `host` and `port` properties in the development environment
  app: {
    keys: env.array('APP_KEYS')
  },
});
Strapi Hosting
The Strapi instance is a bit more involved than the site to host. Please follow the steps below:
-
Make sure you have a Digital Ocean account and access to the NonCommerce project. If you do not, please contact Phil Dutson to give you the correct permissions.
-
Go the Apps tab and select “Create App” and the Web Service option. Follow the naming convention of
sitename-strapi. Select the Basic Plan for hosting. -
Connect github repo with the folder name
/strapi. -
Attach the PostgresSQL database for your project. This should already be created. If you do not see your database, please contact Phil Dutson for assistance.
-
Set App-Level Environment Variables:
| Keys | Value |
|---|---|
| APP_URL | ${APP_URL} |
| NODE_ENV | production |
- Set global variables:
| Keys | Value |
|---|---|
| APP_KEYS | Reference local env |
| API_TOKEN_SALT | Reference local env |
| ADMIN_JWT_SECRET | Reference local env |
| JWT_SECRET | Reference local env |
| DATABASE_URL | ${db-postgresql-sfo3-strapi.database_name_here.DATABASE_URL} |
| DO_SPACE_ACCESS_KEY | Reference local env |
| DO_SPACE_SECRET_KEY | Reference local env |
| DO_SPACE_ENDPOINT | sfo3.digitaloceanspaces.com |
| DO_SPACE_BUCKET | strapi-image-repo |
| DO_SPACE_DIRECTORY | image folder name in Digial Ocean Spaces |
| DO_SPACE_CDN | strapi-image-repo.sfo3.cdn.digitaloceanspaces.com |
| DATABASE_PW | Reference local env |
| DATABASE_USER | Reference local env |
-
Go to Settings, and click “edit” on the app spec section. Scroll to “services:”, then “envs:”, and change the “scope” value under the “DATABASE_URL” key to “RUN_AND_BUILD_TIME”.
-
Wait for it to build 🎉
Astro Hosting
Once you have Strapi live, please follow these steps to get the frontend site launched:
-
Go the Apps tab and select “Create App” and the Static Site option. Follow the naming convention of `sitename-astro“. Select the Basic Plan for hosting.
-
Connect github repo with the folder name
/astro. -
Set App-Level Environment Variables. | Keys | Value | | ----------- | ----------- | | STRAPI_URL | URL for hosted Strapi instance |
- Wait for it to build 🎉
Webhooks
In order to trigger a build each time a Strapi entry is updated, you will need to add a webhook to the Strapi admin. To do this, go into Settings > Webhooks.
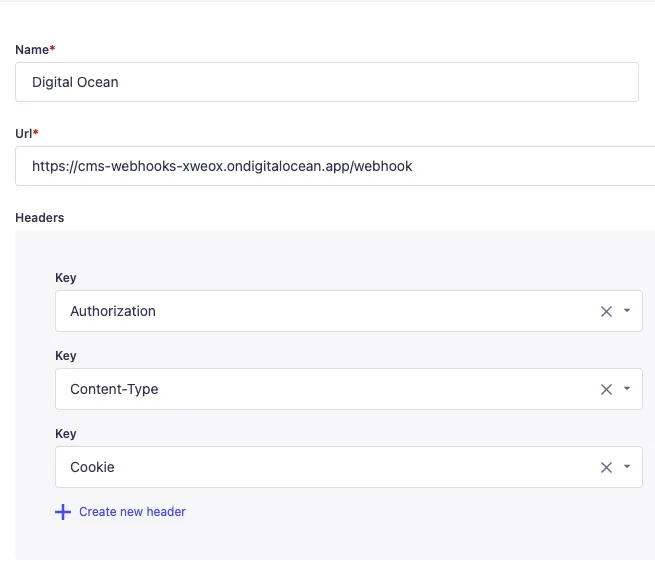
Create a new webhook with the following header:
-
Authorization - check our Box folder for the webhook token
-
Content-Type -
application/json -
Cookie -
app=Digital_ocean_app_idThe app id can be found in Digital Ocean within the app you wish to trigger (usually this will be your Astro app, which will need to rebuild fresh static pages with updated data from Strapi). Simply copy the long character string in the URL after/apps/.
For events to trigger the webhook, be sure to check all of the entry events in the webhook creation window of Strapi.
